Alt-React
I recently got to spend a week at Recurse Center, a programming retreat where you learn by exploring and building. I had a web-app I wanted to build, and it was looking like I would probably use ReactJS. I use React a lot at work and it seemed like the best fit. But there was a problem.
This was my app. If this thing needed maintenance, I’d be doing that on my precious nights and weekends. I don’t have the time or motivation for that. I desperately needed to build an app with no nonsense.
Unfortunately, modern JavaScript development is full of nonsense, and the React ecosystem is no exception.
You can’t just create a React app… you have to create an epic toolchain to get that app running in a web browser. If anything breaks in all those layers of npm, Webpack, Babel, and everything in between, you have to figure out how it all works before you can fix it. Things like Parcel and create-react-app can help, but you’re still downloading 200MB of dependencies and hoping the abstraction doesn’t leak.
I started wondering: what would it take to build a truly no-nonsense React app?
Well, we’d need to get rid of Webpack, since it’s difficult to comprehend and customize. We’d drop Babel too, since transpiling creates a workflow burden (especially for debugging). Honestly, the fewer dependencies the better, to reduce our upgrade and security burden.
Some people have experimented with these kinds of setups, but they’re pretty far off the React happy-path. Specifically, React without JSX is so awkward, that it hardly seems worth it.
So we’re stuck, right?
No!
It turns out that the best parts of React aren’t in the framework itself… it’s in the patterns it embraces. Things like modular components, explicit state management, and a predictable data flow. Reactive UIs.
We can do these things without React. Consider this diagram, showing a simplified flow of a reactive UI:
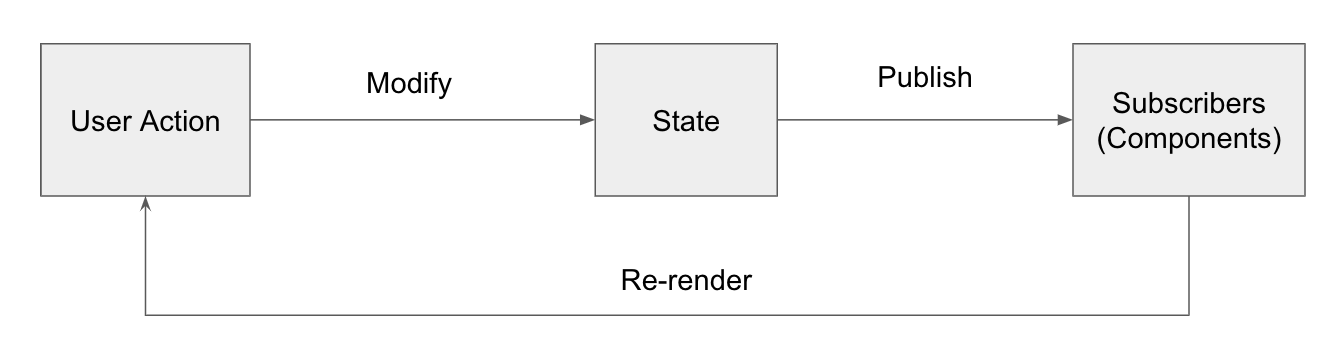
A user takes an action. This modifies state. The state notifies its subscribers (usually, components), and they re-render. There’s not that much going on when it comes down to it.
By writing a system like this in vanilla JavaScript, we can break free of the toolchain complexity. And by adopting modern JavaScript constructs like ES6 modules, classes, and template strings, we can end up with a codebase that’s shockingly React-like, without the workflow and maintenance overhead.
What it looks like
I first got a glimpse of what this could look like, by reading Andy Bell’s Build a state management system with vanilla JavaScript. In it, he builds a basic state-management system (like MobX or Redux), and prototypes some components to go along with it. The resulting code was surprisingly React-like, and without any build or tooling complexity. I felt like he was on to something.
I started to wonder: what would this look like if your goal was to make it as simple and React-like as possible?
To prove the concept, I built a small demo app—a password generator site:
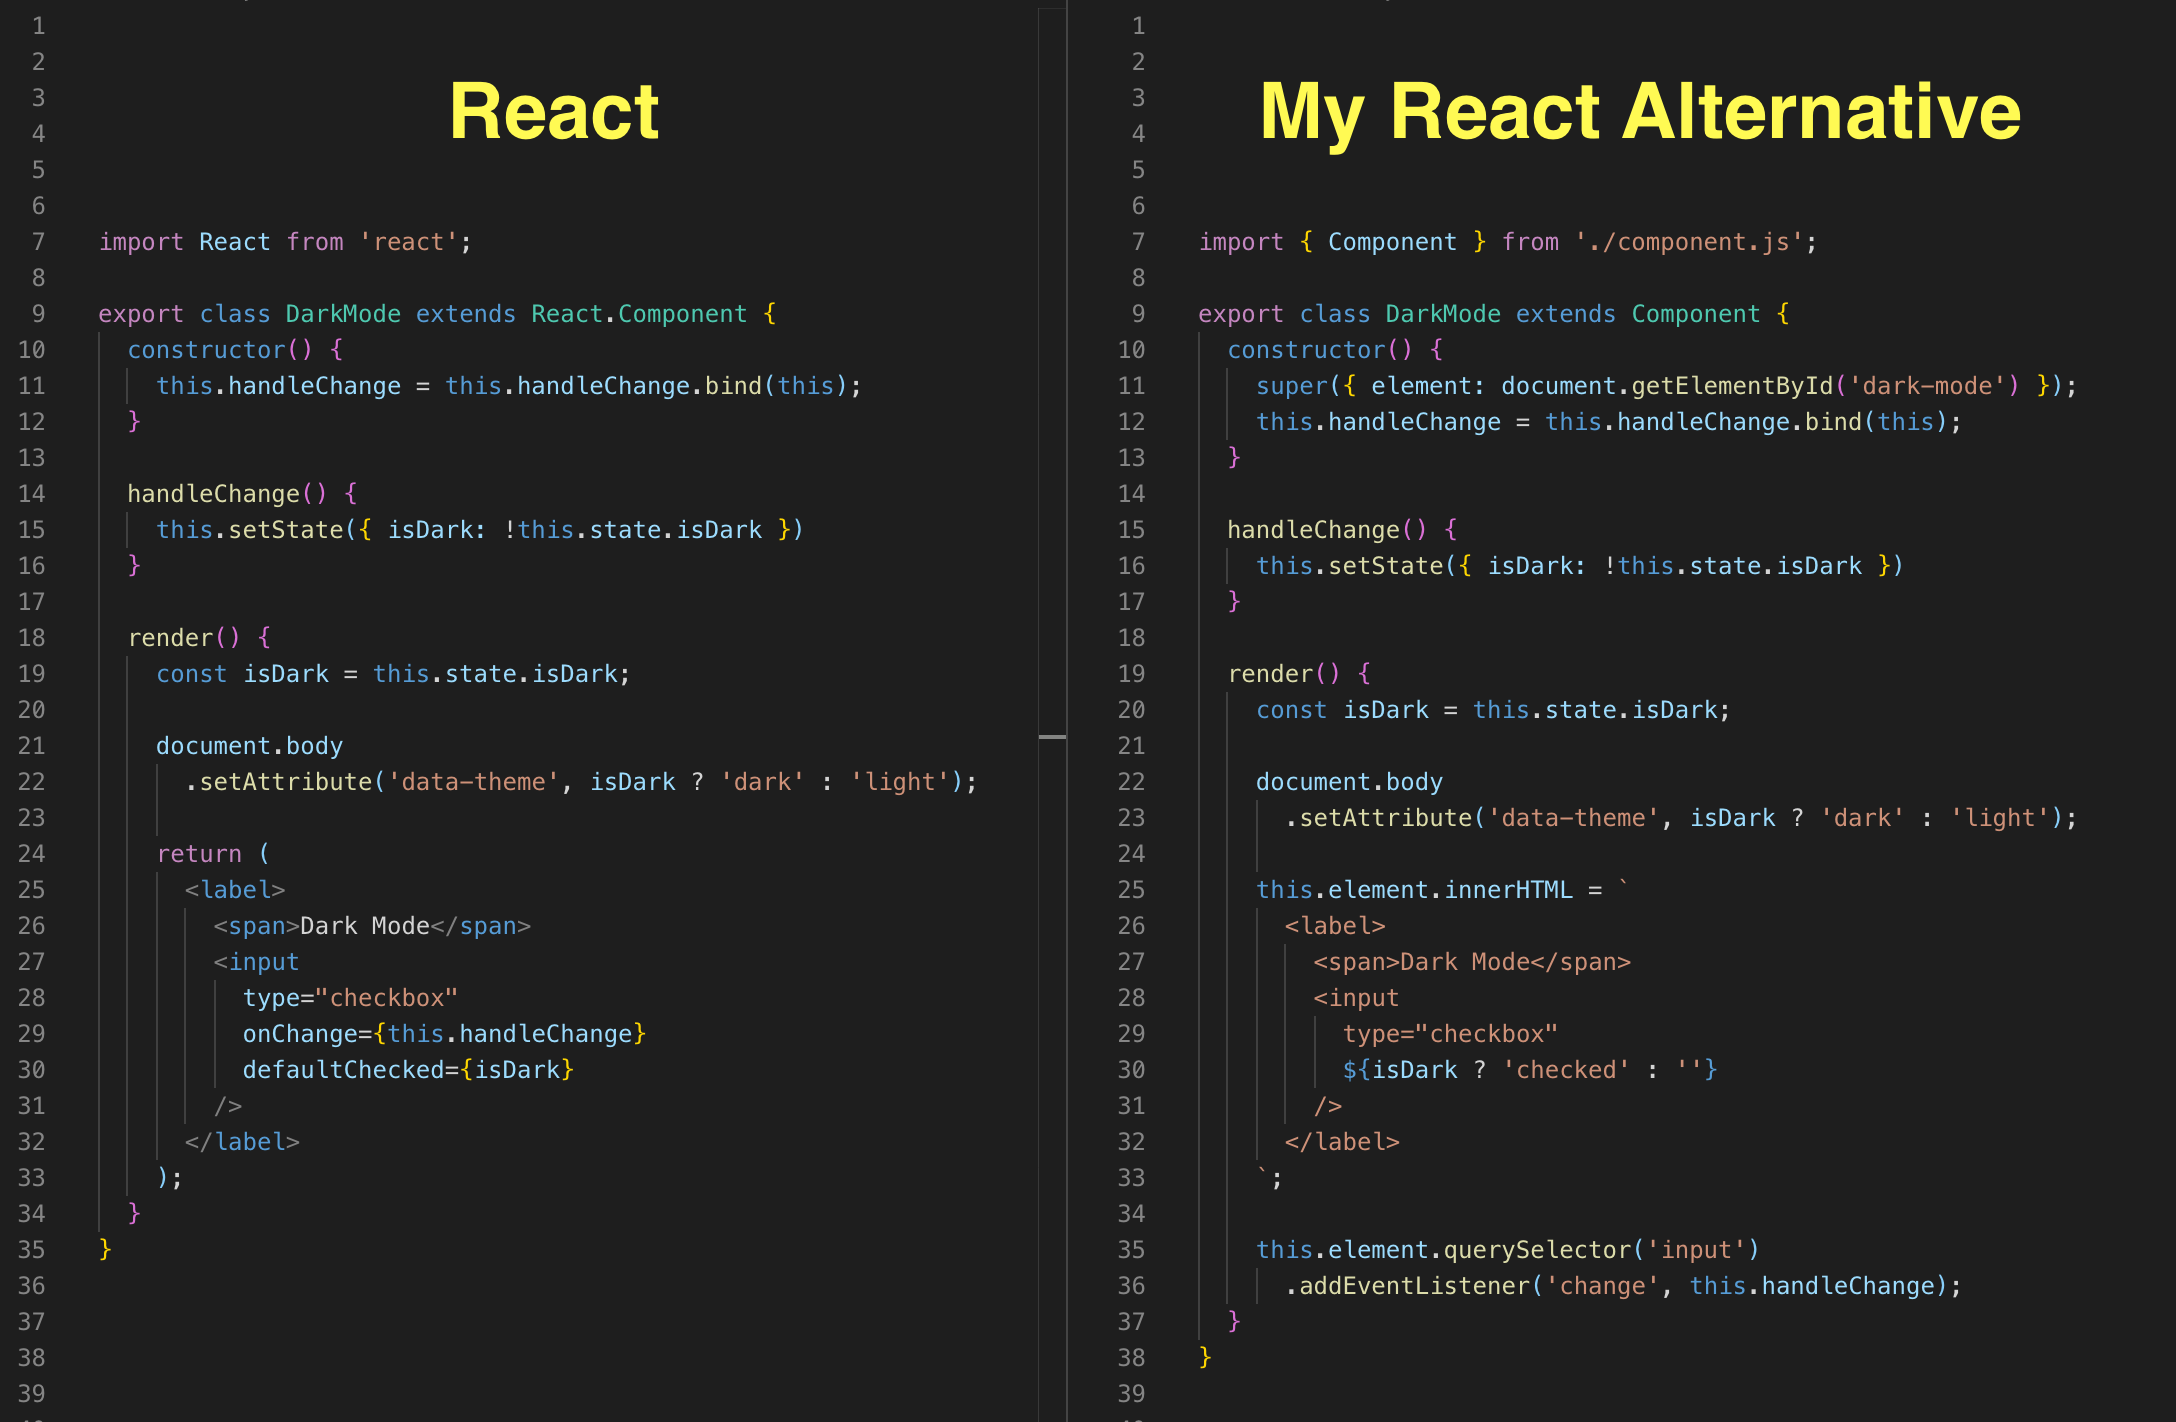
Before we dive into the code, here’s a quick look at the similarities between a typical React component and a component built using my React alternative:
How the demo app works
This section gets in the weeds showing how the demo app works… feel free to skip it if you’re not interested in the implementation details.
The codebase for the app is organized using ES6 modules. Instead of JSX we use ES6 template strings, and instead of DOM-diffing we use native DOM manipulation with getElementById and innerHTML.
All components inherit from a base component, which defines our basic React features like props, a render function, and setState. It looks like this:
export class Component {
  constructor(params = {}) {
    this.props = params.props;
    this.element = params.element;
    this.render = this.render || function () { };
    this.state = {};

    this.setState = (newStateObj) => {
      this.state = Object.assign({}, this.state, newStateObj);
      this.render();
    };
  }
}
With this foundation, we can create custom components, like this DarkMode checkbox:
import { Component } from './component.js';

export class DarkMode extends Component {
  constructor() {
    super({ element: document.getElementById('dark-mode') });

    this.handleChange = this.handleChange.bind(this);
  }

  handleChange() {
    this.setState({ isDark: !this.state.isDark })
  }

  render() {
    const isDark = this.state.isDark;

    document.body.setAttribute('data-theme', isDark ? 'dark' : 'light');

    this.element.innerHTML = `
      <label>
        <span>Dark Mode</span>
        <input type="checkbox" ${isDark ? 'checked' : ''} />
      </label>
    `;

    this.element.querySelector('input')
      .addEventListener('change', this.handleChange);
  }
}
As you can see, it looks just like your typical React component. We have a render function, we define event handlers, and we set local state. The biggest difference is 1) we use getElementById to attach to an existing DOM node, and 2) our render function assigns a markup string to the node’s innerHTML.
We can do a ton with this setup! We can pass props, render child components and even add loops and conditions to our template strings. We could build a whole frontend like this. Not bad!
Of course, if your frontend grows more complex, this could start to feel limited. This happens with React too, and when it does, we often respond by bringing in some more powerful state management solutions. We can do the same thing here.
Custom State Management
Now we could pull in something like Redux or MobX, but for this app, I wanted to show how little it takes to get a basic centralized state management system up and running.
We start by creating a single file where we define a central store containing a state object, a set() function (for setting state), and some publish and subscribe functions (for telling components that the state has changed).
To show how it works, consider this example state object in our store:
this.state = {
  passwordLength: 10,
  characterOptions: {
    hasNumbers: false,
    hasSymbols: false,
  }
};
Here’s how we’d set the state of various properties:
store.set('passwordLength', 12);
store.set('characterOptions.hasNumbers', true);
It works like Lodash’s _.set(). We pass a string showing what we want to set (in this.state), and the value we want to set it to.
We can see this in action, in the updateLength function of our LengthSlider component:
import { Component } from './component.js';
import { CharacterCount } from './character-count.js';
import { store } from '../password-store.js';

export class LengthSlider extends Component {
  constructor() {
    super({
      element: document.getElementById('length-slider'),
    });
  }

  updateLength(event) {
    store.set('passwordLength', parseInt(event.target.value));
  }

  render() {
    this.element.innerHTML = `
      <div>
        Password Length: <output id="character-count"></output>
      </div>
      <input type="range" min="8" max="20" value="${store.state.passwordLength}" />
    `;

    this.element.querySelector('input')
        .addEventListener('input', this.updateLength);

    new CharacterCount({ id: 'character-count' }).render();
  }
}
Whenever the slider is moved, updateLength is called, which sets store.state.passwordLength to the new value.
Our store also has a subscribe method that we can use to run callbacks when the state changes. Here are some examples:
store.subscribe('passwordLength', function renderLengthChange() { ... });
store.subscribe('characterOptions.hasNumbers', function renderHasNumbersChange() { ... });
As you can see, we use strings to reference the part of our state that we are subscribing to. When that piece of state changes, our callback runs.
By building this .subscribe into our base Component, any component we create can be told to re-render during specific state changes. We do this by passing a renderTrigger, as shown in the constructor of the CharacterCount component below:
import { Component } from './component.js';
import { store } from '../password-store.js';

export class CharacterCount extends Component {
  constructor(props) {
    super({
      renderTrigger: 'passwordLength',
      element: document.getElementById('#password-length'),
    });
  }

  render() {
    this.element.innerHTML = store.state.passwordLength;
  }
}
By assigning 'passwordLength' as the renderTrigger, the component will re-render whenever the passwordLength is updated in state (thus updating the character count on the screen).
Web-dev nirvana?
The code powering this setup is twenty lines of plain JavaScript (seventy, if you include our custom state management code). This means there’s no dependencies, and no need for any of the typical React tooling.
It’s hard to overstate how much easier it is to develop once all the extra tooling and abstractions are gone. You save a file, you refresh the page, and you see your changes. There are no set-up instructions, no startup delays, no watch tasks, and no source-maps.
Your browser’s developer tools are useful again. You can read your stack traces. You can pause execution and not be lost. You can inspect your event listeners (because they’re real!).
There’s no watching the page hot-reload and wondering if you need to do a full-reload to get a truly blank slate. There’s no deleting node_modules and re-installing them to see if that magically fixes some issue. You can spend all of your time working on your app, instead of chasing down obscure build issues.
But, but, but,
There are a lot of reasons to be skeptical of an ES6-powered React alternative like the one above. For example:
“Isn’t browser support bad?”
Not as bad as you probably think. Check out caniuse for Template Strings, Classes, and ES6 Modules. Modules has the least support at around 86% global usage, but your userbase matters. If your visitors aren’t using the Chinese UC Browser or Opera Mobile, that percentage jumps to 92%.
“Don’t we need a bundler to use 3rd-party libraries?”
Historically, most NPM modules have published their code in a CommonJS format, which is usable by bundlers, but not by browsers. With ES6 modules growing in popularity, this is starting to change. Lots of 3rd-party libraries are available in ES6 module format, and for those that aren’t, you have a few options:
- Import the global version of the package. This can be loaded in a script tag or an empty import).
- Use some tooling to do a one-time package conversion. Snowpack can turn ESM packages with CommonJS internal dependencies into web-friendly imports. Packages that don’t support ESM at all could probably be converted with the right Rollup plugins.
- Petition the author to create a ES6 bundle (or even better… submit a PR!.) This could be as easy as adding a
moduleproperty to their package.json, or tweaking their bundle settings. I’ve had success asking a number of authors to do this, so if you’re planning to ask, you can use my issue as a template. Remember to search open issues first… if somebody has already requested it, you can ask for a status update.
“Aren’t native ES6 modules slow? So many HTTP requests!”
HTTP requests aren’t as big of a deal if your server supports HTTP/2. Still HTTP/2 isn’t a silver bullet. A lot of research has been done on the performance of HTTP/2 and modules. Most of it is targeted at large websites. Some of it is old. The most recent take from Philip Walton is optimistic, especially if you optimize your modules for production. I think performance concerns are valid, but performance is about tradeoffs and we can find performance wins in other areas to offset any losses we might encounter here (like not downloading a large React bundle, granular file caching, avoiding CSS-in-JS, etc).
If you’re still skeptical, consider that many of these issues can be addressed by creating a production-only build. Waiting to add this until you need it prevents premature optimizations, and once you add it, you still get to enjoy a build-free development workflow. Not a bad compromise.
A system that grows with you
Being framework-free comes with tradeoffs. You’re on your own for documentation, and you won’t get new features unless you build them.
But this can be a good thing. No new features means you aren’t chasing a tortuous upgrade path, or bloating your bundle with things you don’t use. It’s low-maintenance and great for performance.
I ended up building my Recurse Center app on a React alternative (like the one described above**), and one of the things I liked most was the freedom to modify the core functionality whenever I needed to. I found myself embracing this idea of having a system that grows with me.
For example, at one point I wanted more granular events, so I built in the functionality. Now when there’s a change to state.songState.songTitle, it publishes three events. One for 'state', one for 'state.songState' and one for 'state.songState.songTitle'. Just what I needed.
Alt React: an unframework for minimalists
I’ve shown that we can reduce our favorite parts of React to twenty lines of code and a bunch of useful codebase conventions. I think it makes a compelling foundation for a frontend app, with a no-nonsense development workflow.
Anybody can have an “Alt React” like Andy’s or mine. To me that means:
- Adopting React’s codebase conventions (like components that take props and render markup).
- Replacing React-specific features with native JS and DOM APIs (like template strings and event listeners).
- Writing your own core functionality as you need it (like base-component code).
- Minimum viable build tooling.
Your Alt React will end up looking different than mine, because your needs are different than mine. Maybe you find template strings limiting and you want to try htm. Or maybe you like Redux and want to pull it in (it’s ES6 module-friendly). Go for it!
Either way, if you need a place to start, you can copy my demo app, or Andy’s demo app, and iterate from there.
And if you end up trying it out, let me know on twitter. I’d love to hear how it’s working for you.
–
* I agree with Rich Harris when he said: "There's only one reliable way to speed up your code, and that is to get rid of it."
** Here's the repo for my Recurse Center app, if you're interested in seeing a more complex Alt React codebase.